It seems like many parents, and even grandparents, are on Facebook these days. My dad has asked a few times about joining in. Most of us know it’s a great way to share our special family moments and photos. I love seeing what everyone is up to. Auntie May in BC can keep up with how our kids are doing here with school and I don’t have to constantly tell people what shenanigans I am up to! Facebook is great for sharing. But it’s also important to know how to share wisely.
It’s the start of Spring Break for some provinces and the mass exodus from the polar vortex is happening. I’m already seeing glorious beach vacation pics popping up on my Facebook feed from friends. Yes, I am insanely jealous that Chrissy is having a blast in Brazil.
So, here are some timely reminders about how to share photos not just for vacation..but for everyday!
Facebook makes sharing albums with select groups of friends and family easy by using the audience selector tool. Select the drop down menu on the right-hand corner of your album as you are compiling photos, and choose who views your vacation memories. Options include ‘Friends’, ‘Only Me’ ‘Public’ or ‘Custom’.
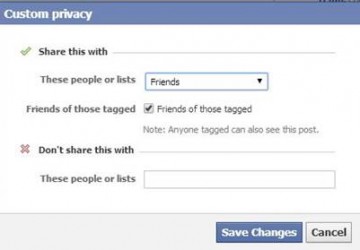
With the ‘Custom’ option you can further tailor your audience by choosing specific people to include or exclude from your posts. For example, share this with ‘Friends’ and don’t share with people who you work with. Additionally use pre-populated or custom lists to choose who sees your content.
To choose the audience for an individual image, upload your picture and use the same audience selector tool, featured on every piece of content you share on Facebook, to select the people you wish to share your photo with.
Collaborate on photo albums with friends by making a shared album where people can contribute and upload photos. Select the ‘Make Shared Album’ function and populate the friends you want to make contributors. For example, if you attend a destination wedding this summer you can create a shared album for the event where everyone selected as contributors can upload photos to that album. You can also let people who are at the wedding, but not your friend on Facebook, post their photos to the shared album.
MONITOR YOUR PERSONAL PHOTO TAGS:
Not all photos taken on vacation are meant to be shared. Use your Activity Log to determine who sees each photo that you are tagged in, even after they have been posted by friends or family. You can activate the ‘Timeline Review’ feature if you want to review and approve tags before they appear on your Facebook timeline. This feature can be activated through the Settings function in the drop down menu at the top right hand corner of your profile.
SHARING WITH PEOPLE OUTSIDE OF FACEBOOK:
You can still share your trip experience with friends or family members who are not on Facebook. Click on the gear icon in the top right corner of your album, select the ‘Get Link’ option. This tool allows you to copy and paste a link in an email and send it to anyone you wish to share your memories with.
SHARING ON MOBILE:
When iPhone users fire up their Facebook app to post a photo, they will see larger thumbnails in their composer – below are a few quick tips on other things you can share with friends when you post a photo to Facebook through your mobile phone.
- Easily select multiple photos to add to a post
- Edit your photo and add a filter before you post
- Tag friends who are in your photos
- Share what you’re listening to, watching, traveling to, feeling, etc.
This post is not sponsored, nor was I compensated. These useful tips were provided by Facebook. As always opinions expressed are my own.


Great tips! Thanks!